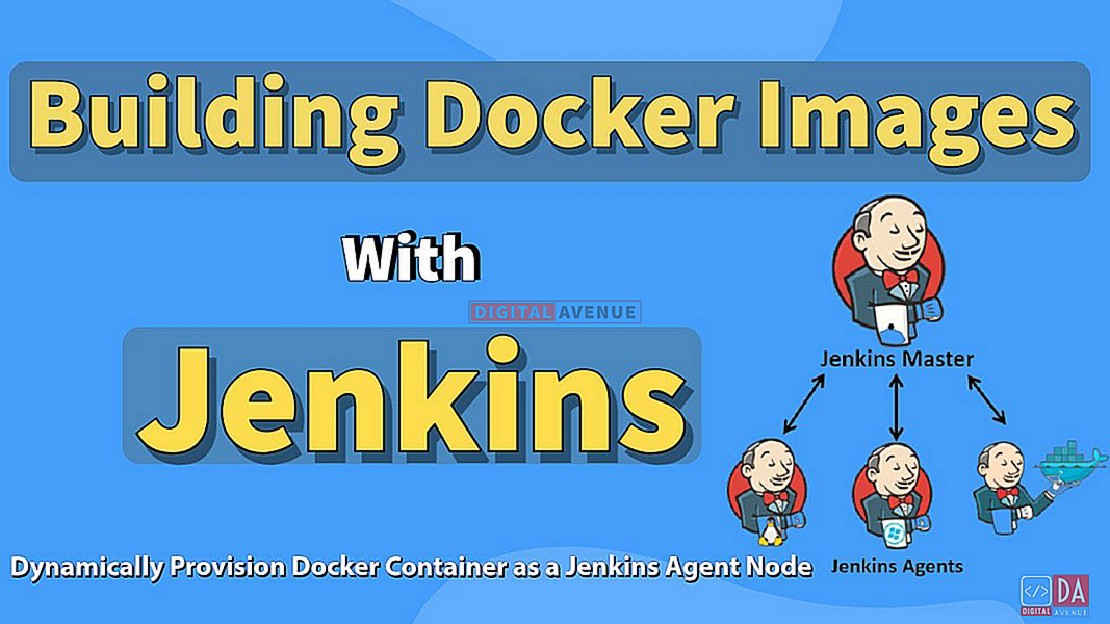
Build Docker Images With Docker Containers as Jenkins Build Slaves
Building Docker Images using Jenkins
This tutorial will show you how to configure Jenkins to build Docker images based on a Dockerfile. These steps will require when you will use Docker with CI/CD pipelines that build your applications into Docker images and deploy into deferent environments such as dev, staging, and finally in production.
I’m already having a Jenkins server that is running as a Docker container. If you don’t have a Jenkins server on a Docker container, You can refer to my previous article to spin up a new one.
STEP 01: Install Docker Plugin
This plugin allows containers to be dynamically provisioned as Jenkins nodes using Docker. It is a Jenkins Cloud plugin for Docker.
This docker plugin aims to be able to use a Docker host to dynamically provision a docker container as a Jenkins agent node, let that run a single build, then tear-down that node, without the build process (or Jenkins job definition) requiring any awareness of docker.
As the first step, you need to install the Docker plugin for Jenkins. Whenever we are using docker in our Jenkins pipelines, Jenkins create a “Cloud Agent” using the “Docker” plugin. This agent will be a “Docker Container, " configured to communicate with our Jenkins server’s Docker Daemon.
The Pipelines with build jobs will use this agent container to execute Docker images to build steps. Then, the docker image can be pushed into a Docker container registry for deployment.
Fist, Head-over to Jenkins server and select “Manage jenkins”, then select the “Manage Plugin” option under “system Configuration.”

Now, Click the “Available” tab to view all the Jenkins plugins that can be installed. Search for “Docker” within the search box. Several plugins are available named “Docker”, but choose the exact plugin which comes under the “Cloud Providers” heading. Then, click the “Install Without Restart” option and install the plugin.
Docker Plugin For Jenkins : https://plugins.jenkins.io/docker-plugin/


STEP 02: Configure Docker Plugin
Once the plugin has been configured, you can define how the Docker plugin needs to launch the Docker containers. This configuration tells the Docker plugin which Docker image to use as the agent. , Docker plugin commands the agent to use a specific Docker image. And after, Docke-Agent Container host the Docker environment to build our Docker image where we defined in the Jenkins pipeline.
When the Docker build request comes from the Jenkins server, Docker-Agent starts to spin up a new container for the Jenkins pipeline task/job.
For the sake of simplicity, This Docker-Agent container spins up when the Jenkins build job/pipeline triggered from the Jenkins server.
Now, Let’s head over to “Manage Jenkins” and select the “Configure System” section. Scroll to the bottom of the page, and there is a section called “Cloud”. And click on the “A separate configuration section” link.
Manage Jenkins > Configure System > [Scroll Down to Far Bottom] > Cloud > [Configure Clouds]
The Cloud Configuration section will be open in a separate section.

Click on the “Add New Cloud” dropdown menu and select the option “Docker” from the list. And then click on the “Docker Cloud Details” button.

Select the option “Docker” from the “Configure Cloud” dropdown button. And then click on the “Docker Cloud Details” button.
Now, You want to set the Docker-Agent Host URI. And Click “Test Connection”. Here you will get the following error as “Client sent an HTTP request to an HTTPS server”.

To solve this issue, we need to setup Server Credentials.
Note: Your test should have worked If you configured Jenkins and Docker-Agent to skip the TLS and to use port 2375. (STEP 04 and 05)
The “Docker Host URI” is where Jenkins launches the agent container. In this scenario, I’ll use my previously configured Docker-Agent’s hostname. (Refer STEP 05)
Click on the “Add” dropdown button and select “Jenkins”, And then we need to create “X.509 Client Certificate” from the Docker-Agent(Dind)’s “/cert” directory. We have created those certificates at STEP-04.

To accomplish this task, you will need the following certificates.
- Client Key = key.pem
- Client Certificate = cert.pem
- Server CA Certificate = ca.pem
We can collect these by running the following docker commands. Copy and paste these certificate content into relevant fields in the “Add Credentials” section.
sudo docker exec jenkins-dind cat /certs/client/key.pem

sudo docker exec jenkins-dind cat /certs/client/cert.pem

sudo docker exec jenkins-dind cat /certs/server/ca.pem
Or else you can locate these file on “/var/lib/docker/volumes/jenkins-docker-certs/_data” mount directory path.
In the end, Your credentials will look like this.

Now, Add your “Docker Host URI and select “Server Credentials” from the dropdown menu. Finally, “Test Connection” will get the Docker version and API version as a result. So, now we can reach the Docker daemon from the Jenkins server. Now, the Jenkins server has been configured to build Docker images.

STEP 03: Configure Docker Agent Templates
The Docker Agent Template is the container that will be started to handle the build process.
Let’s head-over to Manage Jenkins > Configure System > [Scroll bottom] > Cloud > Configure Cloud.
Now, Click on “Docker Agent Template” and then “Add Docker Template”. Here, You can configure the container options. You can attach these templates when you start building docker containers.
I’m using the “jenkins/agent:latest” image for the demonstration purpose, which has the docker client inside.
Here, “Labels” and “Name” cam use to associate a job to a particular agent. This means that Jenkins’s labels build jobs to indicate that they should be built via the Docker agent that we are running here.
Provide required docker command options, as seen in the image below.

STEP 04: Test The Setup
A. Create a Build Project
Now, Let’s move on to the Jenkins dashboard, click on “New Item”, and create “Freestyle Project”.

Set the “Label expression” to “jenkins-agent.”

Then, We need to add a new build step. Move down further and select “Execute Shell” from the “Build” section.

Add the sample “Hello World!” text inside the execution shell box. Now, Save and build your job.

According to the execution commands, Jenkins will download the image, and run the container then run the job upon it. Finally, you will get an output, as seen in the image below.


Also, You can check weather which containers are running on the Docker-on-Docker container by using this command.
docker exec -it jenkins-docker docker ps
While the build process, the result will be output like this.
dimuthu@svr05:~$ sudo docker exec -it jenkins-docker docker ps
CONTAINER ID   IMAGE                  COMMAND     CREATED         STATUS         PORTS     NAMES
be7725b397e3   jenkins/agent:latest   "/bin/sh"   9 seconds ago   Up 9 seconds             kind_carver
Now, All the configuration has been completed from scratch. Now, You can define your own “Cloud Templates” and run the Docker build jobs.
Summary
In this article, you learned to Provision ephemeral Docker Containers as Jenkins Agent Node which helpful for better resource utilization and many more advantages. If you are facing issues with the implementation, please comment below. I will regularly reply here.
Happy learning !
Deploy Production Grade Kubernetes Cluster on Azure AKS
Introduction This tutorial is intended to demonstrate how to setup your 1st Kubernetes cluster on Azure Kubernetes Services (AKS). This tutorial will cover up all the steps that you need to setup complete AKS cluster.
Getting Started With Docker - Quick Start Guide
Getting Started With Docker - Quick Start Guide Docker Engine Platform as a Service (PaaS) Cloud platform service. Allows you to manage its application and data.
How To Run Microsoft SQL Server On Kubernetes - Azure Kubernetes Service
Prerequisites: Azure CLI https://docs.microsoft.com/en-us/cli/azure/install-azure-cli 1. Run the Azure CLI with the az command. 1.1 Run the login command. az login Login in the browser with the azure account.